<?xml version="1.0" encoding="utf-8"?>
<LinearLayout xmlns:android="http://schemas.android.com/apk/res/android"
    xmlns:app="http://schemas.android.com/apk/res-auto"
    xmlns:tools="http://schemas.android.com/tools"
    android:layout_width="match_parent"
    android:layout_height="match_parent"
    android:orientation="vertical"
    android:padding="10dp"
    tools:context=".MainActivity">

    <EditText
        android:id="@+id/Edit1"
        android:layout_height="wrap_content"
        android:layout_width="wrap_content"
        android:layout_margin="10dp"
        android:textSize="20dp"
        android:backgroundTint="#ffffff"
        android:hint="숫자1"
        >
    </EditText>
    <EditText
        android:id="@+id/Edit2"
        android:layout_height="wrap_content"
        android:layout_width="wrap_content"
        android:layout_marginLeft="10dp"
        android:layout_marginTop="25dp"
        android:textSize="20dp"
        android:backgroundTint="#ffffff"
        android:hint="숫자2"
        >
    </EditText>
    <Button
        android:id="@+id/button1"
        android:layout_height="60dp"
        android:layout_width="match_parent"
        android:layout_marginLeft="10dp"
        android:layout_marginRight="10dp"
        android:layout_marginTop="20dp"
        android:layout_marginBottom="15dp"
        android:backgroundTint="#50000000"
        android:textColor="@color/black"
        android:textSize="20dp"
        android:text="더하기"
        >
    </Button>
    <Button
        android:id="@+id/button2"
        android:layout_height="60dp"
        android:layout_width="match_parent"
        android:layout_marginLeft="10dp"
        android:layout_marginRight="10dp"
        android:layout_marginTop="20dp"
        android:layout_marginBottom="15dp"
        android:backgroundTint="#50000000"
        android:textColor="@color/black"
        android:textSize="20dp"
        android:text="빼기"
        >
    </Button>
    <Button
        android:id="@+id/button3"
        android:layout_height="60dp"
        android:layout_width="match_parent"
        android:layout_marginLeft="10dp"
        android:layout_marginRight="10dp"
        android:layout_marginTop="20dp"
        android:layout_marginBottom="15dp"
        android:backgroundTint="#50000000"
        android:textColor="@color/black"
        android:textSize="20dp"
        android:text="곱하기"
        >
    </Button>
    <Button
        android:id="@+id/button4"
        android:layout_height="60dp"
        android:layout_width="match_parent"
        android:layout_marginLeft="10dp"
        android:layout_marginRight="10dp"
        android:layout_marginTop="20dp"
        android:layout_marginBottom="15dp"
        android:backgroundTint="#50000000"
        android:textColor="@color/black"
        android:textSize="20dp"
        android:text="나누기"
        >
    </Button>
    <LinearLayout
        android:layout_width="match_parent"
        android:layout_height="match_parent"
        android:orientation="horizontal"
        android:paddingLeft="10dp">
        <TextView
            android:layout_width="wrap_content"
            android:layout_height="wrap_content"
            android:textSize="40dp"
            android:textColor="#ff0000"
            android:text="계산결과 :">
        </TextView>
        <TextView
            android:id="@+id/ans"
            android:layout_width="wrap_content"
            android:layout_height="wrap_content"
            android:layout_marginLeft="20dp"
            android:textSize="40dp"
            android:textColor="#000000"
            android:text="">
        </TextView>
    </LinearLayout>
</LinearLayout>
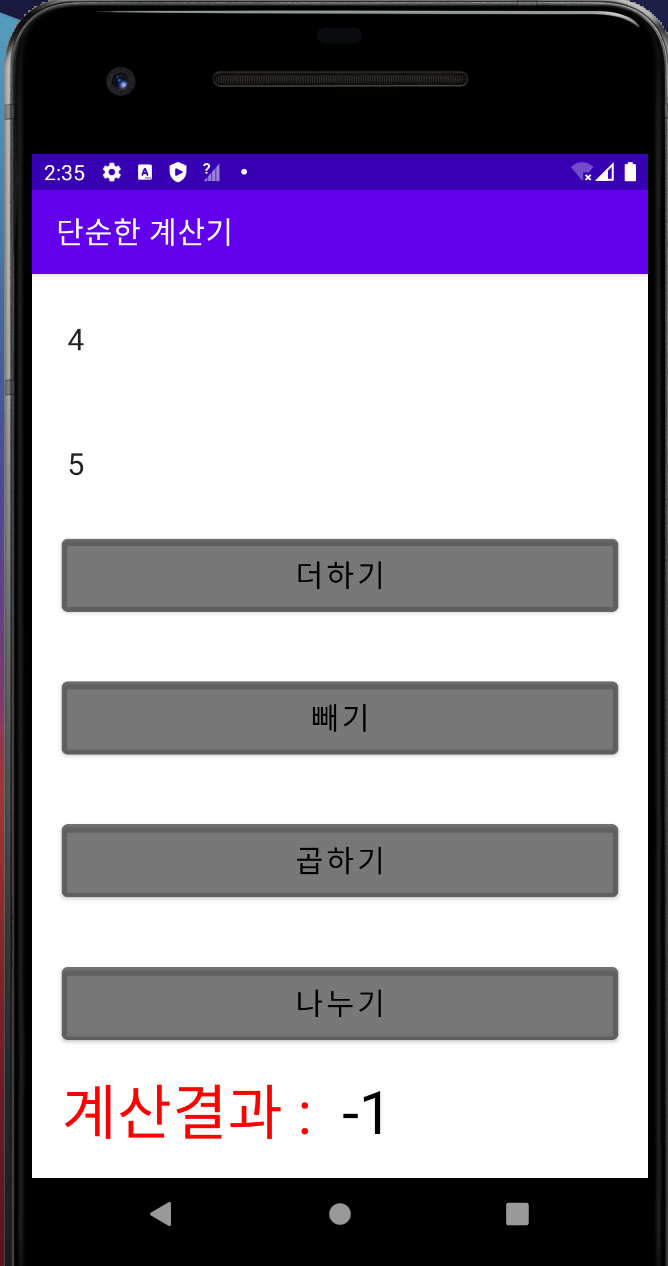
vertical Layout 안에 horizontal Layout을 넣어서 계산기의 레이아웃을 완성시켰다. Layout을 다루는 것이 많이 익숙해진 거 같다.
추가적으로 배운것이 있다면 textSize로 글자 크기를 testColor로 글자 색깔을 바꿀 수 있다는 것이다.
package com.example.calculatpr;

import androidx.appcompat.app.AppCompatActivity;

import android.annotation.SuppressLint;
import android.os.Bundle;
import android.view.MotionEvent;
import android.view.View;
import android.widget.Button;
import android.widget.EditText;
import android.widget.TextView;


public class MainActivity extends AppCompatActivity {
    TextView Edit1,Edit2,ans;
    Button button1,button2,button3,button4;
    String num1,num2;
    Integer result;
    @SuppressLint("ClickableViewAccessibility")
    @Override
    protected void onCreate(Bundle savedInstanceState) {
        super.onCreate(savedInstanceState);
        setContentView(R.layout.activity_main);
        setTitle("단순한 계산기");
        Edit1=(EditText)findViewById(R.id.Edit1);
        Edit2=(EditText)findViewById(R.id.Edit2);
        ans=(TextView) findViewById(R.id.ans);
        button1=(Button) findViewById(R.id.button1);
        button2=(Button) findViewById(R.id.button2);
        button3=(Button) findViewById(R.id.button3);
        button4=(Button) findViewById(R.id.button4);

        button1.setOnTouchListener(new View.OnTouchListener() {
            public boolean onTouch(View arg0, MotionEvent arg1) {
                num1=Edit1.getText().toString();
                num2=Edit2.getText().toString();
                result=Integer.parseInt(num1)+Integer.parseInt(num2);
                ans.setText(result.toString());
                return false;
            }
        });
        button2.setOnTouchListener(new View.OnTouchListener() {
            public boolean onTouch(View arg0, MotionEvent arg1) {
                num1=Edit1.getText().toString();
                num2=Edit2.getText().toString();
                result=Integer.parseInt(num1)-Integer.parseInt(num2);
                ans.setText(result.toString());
                return false;
            }
        });
        button3.setOnTouchListener(new View.OnTouchListener() {
            public boolean onTouch(View arg0, MotionEvent arg1) {
                num1=Edit1.getText().toString();
                num2=Edit2.getText().toString();
                result=Integer.parseInt(num1)*Integer.parseInt(num2);
                ans.setText(result.toString());
                return false;
            }
        });
        button4.setOnTouchListener(new View.OnTouchListener() {
            public boolean onTouch(View arg0, MotionEvent arg1) {
                num1=Edit1.getText().toString();
                num2=Edit2.getText().toString();
                result=Integer.parseInt(num1)/Integer.parseInt(num2);
                ans.setText(result.toString());
                return false;
            }
        });

    }
}
EditText 안에 값은 무조건 String값으로 받아줘야 하는 거 같다.
String 값을 Int로 바꿔주는 명령어는 Integer.parseInt(String)이다.
자바에서 xml의 text 값을 바꿔주는 명령어는 setText(String)이다.
이번에는 눌렀을 때 동작을 OnClickListener가 아니라 OnTouchLitener로 구현하였다.
둘의 차이를 설명하자면 onClickListener는 단순 클릭 이벤트를 받아 이벤트 구현이 가능한 반면,
onTouchListener는
ACTION_UP
ACTION_DOWN
ACTION_MOVE 등 사용자의 손가락 방향, 드래그 등 행동에 맞게 구현, 이벤트 설정이 가능하다.
따라서 계산기를 구현 할 때는 OnClickListener로 구현하는게 더 알맞다.
실행 화면

'안드로이드 > 연습' 카테고리의 다른 글
| [Android] xml RelativeLayout 2 (0) | 2021.08.11 |
|---|---|
| [Android] RelativeLayout 속성 (0) | 2021.08.11 |
| [Android] xml layout_weight (0) | 2021.08.11 |
| [Android] XML 텍스트 색깔 지정 및 위치 조정하기 (0) | 2021.08.10 |
| [Android] 좀 그럴 듯한 앱 (0) | 2021.08.10 |